You can remove wrinkles from a projector screen quickly and safely using gentle heat from a hairdryer or steamer, applying proper tension, or leveraging natural sunlight. These DIY methods are effective for various screen materials like vinyl, polyester, and PVC, often restoring the screen to a smooth surface within minutes to a few days, depending on the wrinkle severity.
Understanding Projector Screen Wrinkles
Before you can effectively tackle screen wrinkles, it’s helpful to understand why they appear and how different materials react. Knowing the root cause can guide you toward the most appropriate and safest removal method.
Common Causes of Projector Screen Wrinkles
Wrinkles often seem to appear out of nowhere, but they typically stem from a few common culprits. Newly purchased screens might arrive with temporary creases from packaging and shipping, as the material can shift and fold during transit. Improper storage is a major factor; folding or rolling a screen without proper care, especially in high humidity environments, can lead to permanent creases. Extreme temperature fluctuations, such as leaving a rolled-up screen in a hot car, can cause the material to expand and contract, leading to unsightly folds. Incorrect installation, including insufficient tension or uneven stretching, is another frequent cause. Even rough handling, like dragging the screen across surfaces or pinching the material, can introduce ripples.
How Different Screen Materials React to Wrinkles
Projector screens are typically made from various materials, including vinyl, polyester, and PVC, each possessing different sensitivities to wrinkling and heat. Vinyl, a popular choice for its reflectivity, can be quite susceptible to wrinkles if not kept properly tensioned. Polyester screens, on the other hand, are often more durable and naturally wrinkle-resistant, with some designed to be folded without permanent damage, making them ideal for portable setups. PVC fabric screens offer flexibility but still require careful handling to avoid creases. Understanding your specific screen material is paramount, as it dictates which wrinkle removal methods are safe and effective, preventing accidental damage to your investment.
Initial Steps for New Wrinkles
When you first notice wrinkles, especially on a newly installed projector screen, don’t panic. Many screens, particularly those with elastic materials, can simply relax and flatten over time once properly stretched onto their frame. Ensure your screen is installed correctly, with adequate and even tension applied across the surface. For fixed-frame screens, this means making sure the material is tautly attached to all anchor points. For retractable screens, allow them to hang fully extended for a few days to see if the wrinkles naturally dissipate. Sometimes, a bit of patience and correct installation are all that’s needed to resolve minor creases.
 A close-up of a projector screen with noticeable wrinkles distorting the image, highlighting a common problem.
Proven DIY Methods for Projector Screen Wrinkle Removal
Once you’ve assessed the situation, you can turn to several DIY methods to gently and effectively remove wrinkles. These techniques primarily rely on heat, tension, or a combination of both to relax and smooth the screen material.
The Gentle Heat Technique (Hair Dryer, Steamer, Iron)
|
Our Picks for the Best Projector Screen in 2026
As an Amazon Associate I earn from qualifying purchases.
|
||
| Num | Product | Action |
|---|---|---|
| 1 | TOWOND Projector Screen and Stand, 150 inch Indoor Outdoor Projection Screen, Portable 16:9 4K HD Rear Front Movie Screen with Carry Bag Wrinkle-Free Design for Home Theater Backyard Cinema |

|
| 2 | Outdoor Projector Screen with Stand - 120 Inch Portable Projector Screen Indoor and Outdoor Projector Screens 16:9 4K HD Wrinkle Free Lightweight Movie Screen with Carry Bag,Enioy Movie Nights |
|
| 3 | AAJK Projector Screen 150 inch, Washable Projector Screen 16:9 Foldable Anti-Crease Portable Projector Movies Screen for Home Theater Outdoor Indoor Support Double Sided Projection |
|
| 4 | TOWOND Projector Screen with Stand, 100 inch Outdoor Projector Screen Portable Indoor Projection Screen 16:9 4K Rear Front Movie Screen with Carry Bag for Home Backyard Theater 100 inch |
|
| 5 | Projector Screen,HUANYINGBJB 4K 16:9 HD Rear Front Projector Screen Foldable Projection Screen Double-Sided Portable Outdoor Indoor Projector Screens for Movie Home Theater (120) |
|
| 6 | TOWOND Outdoor Projector Screen with stand, 120 inch Portable Movie Screen - 16:9 4K HD Foldable Anti-Crease Projection Screen with Carry Bag for Movie Nights, Camping and Parties Support Double Sided |
|
| 7 | Pyle 50 Inch Portable Projector Screen with Tripod Stand – Lightweight, Durable, Easy Pull Setup Mobile Projection Screen with 4:3 Aspect Ratio, White Matte Fabric for Indoor/Outdoor Use |
|
| 8 | 120 inch Projector Screen 2025 Upgraded- Black Backing, Straight Edges, Foldable, Washable and Wrinkle-Free - for Indoor Home Theater and Outdoor Cinema -White 16:9 by IOLIEO |
|
| 9 | Taotique Projector Screen 72 inch, Movie Projector Screen 16:9 HD Foldable and Portable Anti-Crease Indoor Outdoor Projection Double Sided Video Projector Screen for Home, Party, Office, Classroom |
|
| 10 | 120inch Outdoor Projector Screen with Stand: 16:9 4K HD Portable Projector Screen Outdoor Indoor - Front/Rear Movie Screen with Carry Bag, Sandbag - Projection Screen for Backyard, Camping, Theater |
|
Heat is a powerful tool for relaxing screen material and smoothing out wrinkles, but it must be applied with extreme caution to avoid damage. The goal is to use the minimum amount of heat necessary.
Hair Dryer Method
The hairdryer is a common and effective tool for tackling localized wrinkles.
- Preparation: Lay the projector screen flat on a clean, soft surface, or hang it tautly from a clothesline or frame.
- Application: Set your hairdryer to its lowest heat setting. Hold it a few inches away from the backside of the screen, focusing on the wrinkled areas.
- Technique: Use quick, broad sweeping motions, continuously moving the hairdryer to prevent heat from concentrating in one spot. Avoid staying in one area for too long, as excessive heat can melt or damage the material.
- Monitoring: Gently touch the screen with your free hand to ensure it’s warming up but not getting too hot. Work in small sections, perhaps 2×2 feet at a time.
- Cool Down: Once a section feels warm and the wrinkles begin to subside, remove the heat and let it cool naturally while still stretched. The material will retract into its smooth shape as it cools. Repeat if necessary.
Clothes Steamer Method
A clothes steamer can be particularly effective for fabric-based screens, as steam penetrates the fibers to loosen wrinkles more gently than direct dry heat.
- Setup: Hang your projector screen in an open area, ensuring it’s as stretched as possible.
- Steaming: Hold the steamer nozzle a few inches from the backside of the screen. Move it steadily across the wrinkled areas, allowing the steam to relax the fabric.
- Caution: Do not hold the steamer in one spot, and avoid direct contact with the screen surface. Monitor for any signs of water damage or discoloration.
Iron Method (Steam Iron Preferred)
Using an iron can also work, but it’s crucial to use a steam iron and apply heat indirectly.
- Protection: Place the projector screen on a flat, heat-resistant surface, with a clean, thin sheet or towel underneath and another on top to protect the screen material.
- Ironing: Set your iron to the lowest steam setting. Iron the backside of the screen, never directly on the viewing surface.
- Movement: Use vertical movements and keep the iron constantly moving. Never let the iron rest in one place, as this can easily cause irreparable damage.
Safety Guidelines for Heat Application
- Always test on an inconspicuous area first.
- Never apply high heat directly to the viewing surface.
- Keep the heat source moving to prevent localized overheating.
- Use the lowest effective heat setting.
- Protect the screen with a damp cloth or towel if applying heat from the front or if you’re concerned about direct contact.
- Patience is key; rushing can lead to damage.
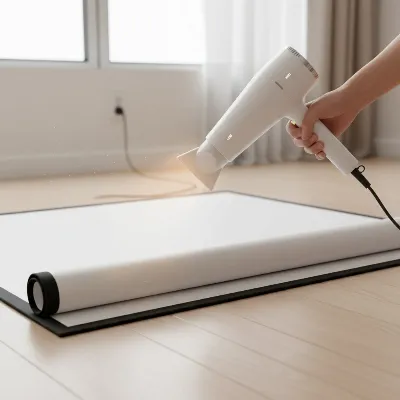 A person carefully using a hairdryer on the backside of a projector screen to remove wrinkles with gentle heat.
Harnessing Natural Heat and Tension
Sometimes, the simplest solutions are the most effective. Natural heat sources and proper tension can work wonders for flattening screen wrinkles.
Direct Sunlight Method
Sunlight offers a gentle and uniform heat source that can help relax screen material.
- Exposure: On a warm, sunny day, hang your screen outdoors or lay it flat with the backside facing the sun. For fixed-frame screens, you can bring the entire frame outside.
- Duration: Depending on the wrinkle severity and climate, leave it in direct sunlight for 10 to 60 minutes. The material should become loose and flexible.
- Cooling: Bring the screen out of direct sunlight and allow it to cool down in a normal temperature environment while still stretched flat. As it cools, the material should become taut and wrinkle-free.
- Repeat: If wrinkles persist, you may need to repeat the process.
Applying Tension
For screens that are designed to be stretched, ensuring proper tension can often resolve wrinkles.
- Re-Stretching: If your screen is mounted on a frame, carefully re-stretch the material, ensuring even tension across all sides. Sometimes, wrinkles are simply due to inadequate or uneven stretching during the initial setup.
- Adding Weights: For hanging screens, you can apply gentle pressure at the base or attach modest, even weights to the lower edge. This downward pull can help stretch the screen flat, smoothing out creases. Be cautious not to use excessive weight, which could damage the screen.
Adjusting Integrated Tension Systems
Many higher-end fixed-frame or tab-tensioned electric screens incorporate mechanisms to adjust tension.
- Consult Manual: Refer to your projector screen’s manual for specific instructions on adjusting its tension system.
- Fine-Tuning: These systems often involve movable snap posts or tensioning tabs around the perimeter that can be slightly adjusted to pull the material taut and eliminate puckers or minor wrinkles. Make small adjustments, as the screen material may take a few days to respond fully to the new tension.
Other Effective Solutions
While heat and tension are primary methods, a few other solutions can address minor wrinkles.
Wrinkle Release Sprays
For very minor wrinkles, a wrinkle release spray can be a quick fix.
- Compatibility: It’s crucial to select a spray that is explicitly safe for your specific screen material. Test on an inconspicuous area first to ensure no discoloration or damage occurs.
- Application: Lightly mist the backside of the wrinkled area and gently smooth the fabric by hand while it dries. These sprays work by relaxing fabric fibers, allowing wrinkles to dissipate naturally.
 A projector screen hanging outdoors in direct sunlight, or being gently stretched on a frame, to naturally flatten wrinkles.
Crucial Considerations for Successful Wrinkle Removal
Successful wrinkle removal isn’t just about applying a technique; it’s about making informed decisions based on your screen, the severity of the problem, and your environment.
Identify Your Screen Material
Knowing your projector screen’s material is perhaps the most critical factor in choosing a safe removal method. Vinyl, polyester, and PVC screens all react differently to heat and tension. For instance, while a gentle steamer might be ideal for a fabric-based screen, too much moisture or direct heat could damage a sensitive vinyl surface. Always consult your screen’s manufacturer guidelines or product specifications before attempting any DIY methods. This ensures you use techniques compatible with your screen’s unique composition and prevents irreversible harm.
Assess Wrinkle Severity and Screen Type
Not all wrinkles are created equal, and your approach should vary based on their severity and screen type. Light, temporary waves from packaging might simply disappear with proper stretching and time. Deeper, more persistent creases, however, may require a more active heat treatment. Fixed-frame screens benefit greatly from sustained tension and controlled heat (like a room’s central heating system), while retractable or portable screens might respond better to spot treatments with a hairdryer or direct sunlight. Electric screens with tensioning systems offer a sophisticated way to adjust flatness, but to follow the manufacturer’s instructions precisely.
The Role of Environment: Temperature and Humidity
Environmental factors play a significant role both in causing and curing projector screen wrinkles. High humidity can exacerbate wrinkling in some materials, while extreme temperatures can cause expansion and contraction. However, you can also leverage these factors. A warm, dry environment can help relax screen material, making it more pliable for wrinkle removal. If you live in a very dry climate, applying a tiny bit of moisture (via steam or a slightly damp cloth) before gentle heat can sometimes aid the process. Conversely, cooling a screen after heat treatment while it’s still stretched taut helps the material set in its smooth, flat state.
When to Consult a Professional or Consider Replacement
While many wrinkles are treatable with DIY methods, there are instances when professional help or even a screen replacement might be necessary. If you have severe, permanent creases that don’t respond to gentle, repeated treatments, or if you accidentally cause damage while attempting a DIY fix, it’s best to stop and seek expert advice. Projector screen specialists have advanced tools and techniques for restoration. If your screen is old, heavily damaged, or if the cost of professional repair approaches the cost of a new screen, investing in a high-quality, wrinkle-resistant replacement, such as those made from durable polyester blends, might be the most practical long-term solution.
Conclusion
A flawless projector screen is the foundation of an immersive viewing experience, and persistent wrinkles can be a major distraction. Fortunately, with careful application of DIY techniques involving gentle heat, appropriate tension, and a good understanding of your screen material, you can often restore your projector screen to its original smooth condition. to always prioritize safety, use minimal heat, and be patient throughout the process. By following these guidelines, you’ll not only fix existing wrinkles but also learn valuable habits for preventing future creases, ensuring your screen remains pristine for years to come. What’s your go-to method for keeping your projector screen perfectly smooth?
FAQ
Can I use a regular clothing iron on my projector screen?
You can use a regular clothing iron, but with extreme caution. Always use a steam iron on the lowest heat setting and apply it to the backside of the screen only, with a clean protective cloth or sheet between the iron and the screen material. Keep the iron constantly moving to avoid damaging the surface.
How long does it take for wrinkles to disappear?
The time it takes varies depending on the wrinkle severity, the screen material, and the method used. Minor wrinkles might disappear in a few hours with tension or gentle heat, while more stubborn creases could require several applications over a few days or even a warm room for a couple of hours. Patience is key.
What causes wrinkles on a new projector screen?
New projector screens often develop temporary wrinkles due to being folded or rolled incorrectly during packaging and shipping. These creases are usually superficial and often resolve themselves once the screen is properly installed and stretched, or with minimal heat application.
Is it safe to use a wrinkle release spray?
Wrinkle release sprays can be effective for minor wrinkles. However, it is crucial to first verify that the spray is safe for your specific projector screen material. Always test it on an inconspicuous area to ensure it doesn’t cause discoloration or damage before applying it more broadly.
How can I prevent wrinkles from forming in the first place?
Prevent wrinkles by storing your projector screen properly (rolled neatly, not folded, in a cool, dry place), handling it gently during setup and takedown, ensuring correct and even tension during installation, and avoiding extreme temperature fluctuations. Regular inspection for small creases can also help address issues before they worsen.
Frequently Asked Questions
Can I use a regular clothing iron on my projector screen?
Yes, you can use a regular clothing iron, but with extreme caution. Always use a steam iron on the lowest heat setting and apply it to the backside of the screen only, with a clean protective cloth or sheet between the iron and the screen material. Keep the iron constantly moving to avoid damaging the surface.
How long does it take for wrinkles to disappear from a projector screen?
The time varies depending on wrinkle severity, screen material, and method. Minor wrinkles might disappear in a few hours with tension or gentle heat, while more stubborn creases could require several applications over a few days or even a warm room for a couple of hours. Patience is key for optimal results.
What causes wrinkles on a new projector screen?
New projector screens often develop temporary wrinkles due to being folded or rolled incorrectly during packaging and shipping. These creases are usually superficial and often resolve themselves once the screen is properly installed and stretched, or with minimal heat application like a hairdryer on a low setting.
Is it safe to use a wrinkle release spray on projector screen material?
Wrinkle release sprays can be effective for minor wrinkles, but it is crucial to first verify that the spray is safe for your specific projector screen material. Always test it on an inconspicuous area to ensure it doesn't cause discoloration or damage before applying it more broadly to the screen surface.
What are the best ways to prevent projector screen wrinkles?
Prevent wrinkles by storing your projector screen properly (rolled neatly, not folded, in a cool, dry place), handling it gently during setup and takedown, ensuring correct and even tension during installation, and avoiding extreme temperature fluctuations. Regular inspection for small creases can also help address issues before they worsen.
How to Remove Wrinkles from a Projector Screen
This guide provides step-by-step instructions for safely removing wrinkles from your projector screen using gentle heat, tension, and natural methods.
Lay the screen flat or hang it taut. Use a hairdryer on its lowest setting, holding it a few inches from the backside of the wrinkled areas. Move the hairdryer continuously in broad sweeping motions to prevent heat concentration and avoid damage.
Hang your fabric-based projector screen in an open area, ensuring it's stretched. Hold the steamer nozzle a few inches from the backside of the screen and move it steadily across wrinkled areas. Avoid direct contact and monitor for any signs of water damage.
On a warm, sunny day, hang your screen outdoors or lay it flat with the backside facing the sun for 10 to 60 minutes. After exposure, allow it to cool naturally while still stretched. For mounted screens, re-stretch the material to ensure even tension across all sides.
If your screen has an integrated tension system, consult the manufacturer's manual for specific instructions. Make small adjustments to movable snap posts or tensioning tabs around the perimeter to pull the material taut. Allow a few days for the screen material to fully respond to the new tension.
For very minor wrinkles, select a wrinkle release spray explicitly safe for your screen material. Test on an inconspicuous area first. Lightly mist the backside of the wrinkled area and gently smooth the fabric by hand while it dries, allowing fibers to relax.
Get our weekly buyer guide
Practical specs, not advice. Unsubscribe anytime.
I was so frustrated with the creases on my new vinyl screen right out of the box. I tried the hairdryer method mentioned here, and it worked like a charm! It took a little patience, but within about 15 minutes, most of the wrinkles were gone. My outdoor movie nights are saved!
The natural sunlight tip for removing wrinkles sounded promising, but it didn’t quite do the trick for my polyester screen. I left it out for a few hours on a sunny day, and while some minor creases faded, the deeper ones are still pretty visible. I guess I’ll have to try the steamer next.
I’ve always struggled with getting my portable projector screen perfectly smooth for our indoor setup. The advice about applying proper tension was a game-changer. I realized I wasn’t stretching it enough when setting it up, and now it looks much better. Thanks for the simple but effective tip!
My old PVC screen had some really stubborn wrinkles from being stored folded for too long. I was skeptical about the steamer method, but it actually worked wonders! It took a bit longer than ‘minutes’ for the really deep ones, but after a couple of sessions, my screen is looking almost brand new. Highly recommend trying it.