Using a white wall as a projector screen is feasible for casual viewing, offering cost-effectiveness and setup ease, but it introduces significant trade-offs in image quality compared to a dedicated screen. Standard white walls lack optimized reflection properties, leading to less vibrant colors, reduced contrast, and potential distortions from surface imperfections. For optimal results, meticulous wall preparation, a high-lumen projector (3000+ lumens), and environmental light control are crucial, with specialized projector paint offering a notable upgrade.
Projecting on a White Wall: The Appeal and the Reality
The idea of projecting directly onto a wall holds significant appeal for many, primarily due to its simplicity and perceived savings. However, understanding the reality of its performance is crucial.
Advantages of Using a White Wall
One of the most immediate benefits of using a white wall is its cost-effectiveness. If you already have a smooth, light-colored wall, there’s no need for an additional purchase, saving you money on a dedicated screen. This makes it an attractive option for budget-conscious individuals or those setting up a temporary viewing area.
Beyond cost, the ease of setup is another major draw. No complex installation is required; you simply project directly onto the clean wall, making for a straightforward and quick home theater setup. This also contributes to a minimalistic design, as it eliminates the need for extra equipment, maintaining a clean, uncluttered look in your space.
Finally, a wall offers unmatched design flexibility, particularly concerning projection size. Unlike fixed-dimension screens, a white wall provides an unrestricted canvas, allowing you to easily adjust the projection size to fill your available space without the constraints of a physical screen frame.
The Inherent Limitations
Despite these advantages, relying on a standard white wall for projection comes with several inherent limitations that can significantly impact your viewing experience.
The most notable compromise is in image quality. A standard white wall will not provide the same level of color accuracy, brightness, or clarity as a screen specially designed for projecting images. Standard wall paints are not optimized for reflections, often leading to less vibrant or slightly skewed colors, and the wall may absorb more light than a screen.
Surface imperfections are another common issue. Most walls, upon close inspection, are not perfectly smooth; they may have bumps, cracks, or an “orange-peel” texture. These subtle irregularities can cause visual distortions, blurring, or a less sharp and bright image, especially noticeable with higher resolution content.
Walls also lack the specialized reflection and gain properties found in dedicated screens. Projector screens are crafted with materials and coatings designed to optimize light reflection uniformly, ensuring vibrant colors and sharp images. A bare wall, in contrast, scatters light in all directions, which can diminish the overall brilliance and focus of the image.
A significant drawback is the poor ambient light rejection (ALR) of a plain wall. Unlike many modern screens that can reflect projector light while absorbing or deflecting ambient room light, a white wall provides no such benefit. This means that in well-lit rooms, the projected image can appear washed out and lack contrast.
A white wall may result in limited viewing angles. Viewers seated off-center might experience a slight loss in brightness and contrast, as the light reflection is not optimized for a wide field of view. Lastly, the absence of a distinct black border around the projected image on a wall can negatively affect perceived contrast, as the eye has no clear boundary to focus the image within.
 A projector image distorted on an uneven wall surface, illustrating the negative impact of imperfections on clarity and sharpness.
Enhancing Your White Wall Projection Experience
While a white wall presents challenges, there are several steps you can take to significantly enhance the viewing experience if you choose this route.
Wall Preparation is Key
|
Our Picks for the Best Projector Screen in 2026
As an Amazon Associate I earn from qualifying purchases.
|
||
| Num | Product | Action |
|---|---|---|
| 1 | 120 inch Projector Screen 2025 Upgraded- Black Backing, Straight Edges, Foldable, Washable and Wrinkle-Free - for Indoor Home Theater and Outdoor Cinema -White 16:9 by IOLIEO |

|
| 2 | Pyle 50 Inch Portable Projector Screen with Tripod Stand – Lightweight, Durable, Easy Pull Setup Mobile Projection Screen with 4:3 Aspect Ratio, White Matte Fabric for Indoor/Outdoor Use |
|
| 3 | Outdoor Projector Screen with Stand - 120 Inch Portable Projector Screen Indoor and Outdoor Projector Screens 16:9 4K HD Wrinkle Free Lightweight Movie Screen with Carry Bag,Enioy Movie Nights |
|
| 4 | TOWOND Outdoor Projector Screen with stand, 120 inch Portable Movie Screen - 16:9 4K HD Foldable Anti-Crease Projection Screen with Carry Bag for Movie Nights, Camping and Parties Support Double Sided |
|
| 5 | 120inch Outdoor Projector Screen with Stand: 16:9 4K HD Portable Projector Screen Outdoor Indoor - Front/Rear Movie Screen with Carry Bag, Sandbag - Projection Screen for Backyard, Camping, Theater |
|
| 6 | Projector Screen,HUANYINGBJB 4K 16:9 HD Rear Front Projector Screen Foldable Projection Screen Double-Sided Portable Outdoor Indoor Projector Screens for Movie Home Theater (120) |
|
| 7 | AAJK Projector Screen 150 inch, Washable Projector Screen 16:9 Foldable Anti-Crease Portable Projector Movies Screen for Home Theater Outdoor Indoor Support Double Sided Projection |
|
| 8 | Taotique Projector Screen 72 inch, Movie Projector Screen 16:9 HD Foldable and Portable Anti-Crease Indoor Outdoor Projection Double Sided Video Projector Screen for Home, Party, Office, Classroom |
|
| 9 | TOWOND Projector Screen and Stand, 150 inch Indoor Outdoor Projection Screen, Portable 16:9 4K HD Rear Front Movie Screen with Carry Bag Wrinkle-Free Design for Home Theater Backyard Cinema |
|
| 10 | TOWOND Projector Screen with Stand, 100 inch Outdoor Projector Screen Portable Indoor Projection Screen 16:9 4K Rear Front Movie Screen with Carry Bag for Home Backyard Theater 100 inch |
|
The foundation of a good wall projection lies in meticulous preparation. First, ensure the smoothness and flatness of your wall. Even minor textures can diffuse light and soften fine details. Consider sanding down any imperfections, filling cracks, and if necessary, applying a skim coat to create a perfectly even surface.
Once flat, maintain cleanliness. Over time, dust, dirt, or fingerprints can accumulate, affecting image quality. Regularly clean the projection area with a soft, lint-free cloth, avoiding harsh chemicals that might damage the paint.
Choosing the Right Projector
Your projector choice plays a vital role. For wall projection, a projector with high lumen output is crucial to counteract the wall’s less efficient light reflection. Look for models with at least 3000+ lumens for a bright, punchy image, especially if some ambient light is present. While many projectors work, those offering higher resolution (HD or 4K) will benefit most from any surface optimization, displaying clearer details.
Optimizing Your Environment
Controlling your viewing environment is paramount. Controlling ambient light is perhaps the most impactful step. Blackout curtains are your best defense against external light, and ensure all internal room lights, especially those near the projection area, are turned off. The darker the room, the more vibrant and contrasted your image will appear.
Proper projector placement and settings are also essential. Position your projector on a stable surface directly opposite the center of your desired projection area. Adjust the throw distance until the image perfectly fills the space. While keystone correction can straighten a crooked image, it’s a digital process that can slightly reduce image quality, so always aim for physical alignment first. Experiment with your projector’s picture modes, such as “Cinema” for balanced colors or “Dynamic” for maximum brightness, and fine-tune brightness and contrast settings to suit your room’s conditions.
The Role of Projector Screen Paint
For those committed to using their wall but seeking a significant upgrade, projector screen paint is a specialized solution. This isn’t just regular paint; it’s formulated with microscopic reflective particles, often glass beads or similar materials, designed to bounce light back towards the viewer more efficiently than standard paint. This specialized coating enhances brightness and clarity, creating a visually stunning experience.
Projector paints come in various types and “gain” values (reflectivity). White projector paint (often with a gain around 1.0 to 1.2) is excellent for high-resolution images and rooms with good light control, providing bright and accurate colors. Alternatively, gray projector paint is designed to enhance contrast and deepen black levels, making it a good choice for rooms with some unavoidable ambient light. Critically, always opt for a matte finish to prevent unwanted reflections and “hotspotting” (an overly bright area in the center of the screen). Acrylic and latex paints are common bases, but dedicated digital projection screen paints offer superior performance.
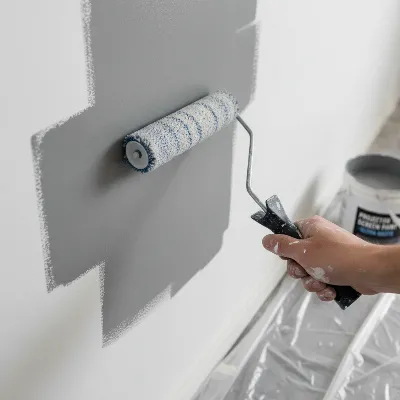 A close-up of a hand applying specialized projector screen paint to a wall with a roller, showing an even, matte finish.
White Wall vs. Dedicated Projector Screen: A Comparison
The decision to use a white wall or invest in a dedicated screen ultimately boils down to your priorities, viewing habits, and budget. Let’s break down the key differences and help you decide.
Key Differences in Performance
| Feature | White Wall | Dedicated Projector Screen |
|---|---|---|
| Surface | Often uneven, textured; scatters light. | Ultra-smooth, uniform texture; even light reflection. |
| Reflectivity & Gain | Low, diffuse reflection; absorbs light. | Optimized gain; directs light efficiently. |
| Color Accuracy & Contrast | Less accurate, muted colors; lifted blacks. | True-to-source colors, deep blacks, high contrast. |
| Ambient Light Rejection | None; images wash out easily. | Many models feature ALR/CLR technology. |
| Viewing Angles | Limited; brightness/contrast drop off-axis. | Consistent brightness and color across wide angles. |
| Durability & Maintenance | Prone to dust, fingerprints, wear; harder to clean. | Designed for longevity; easy to clean, protected surfaces. |
| Borders | Borderless, can reduce perceived contrast. | Often features black borders to enhance focus. |
A dedicated projector screen is engineered to reflect light evenly, providing better color accuracy, contrast, and sharpness compared to a typical wall. Screens often feature special coatings to enhance visual fidelity and uniformity, something standard wall paint cannot replicate.
> “While a white wall offers convenience, it generally has a limited viewing angle and may lack the screen gain provided by dedicated projector screens. Screen gain refers to the reflective properties of a screen, with higher gain screens producing brighter images.” – ReviewsBazzar.com Admin
When a White Wall Makes Sense
Using a white wall is a viable choice under specific circumstances. It’s ideal for casual viewing, such as impromptu movie nights or background visuals, where optimal image quality isn’t the primary concern. For temporary setups or multi-purpose rooms where a permanent screen isn’t practical, a wall offers unmatched flexibility. Naturally, if you have budget constraints, a well-prepared white wall can provide a satisfactory big-screen experience without the additional investment of a screen. Its ability to offer maximum size flexibility also makes it appealing, allowing you to easily adjust your projection size to fit any content or occasion.
When to Invest in a Dedicated Screen
For anyone serious about their projection experience, investing in a dedicated screen is highly recommended. This is particularly true for critical viewing, such as building a dedicated home theater, giving professional presentations, or competitive gaming, where every detail matters. A screen delivers optimal image quality, ensuring razor-sharp clarity, true-to-life colors, and deep contrast that walls simply cannot match.
In rooms with significant ambient light, a dedicated Ambient Light Rejecting (ALR) or Ceiling Light Rejecting (CLR) screen is invaluable. These screens are specifically designed to preserve contrast and brightness even in bright environments, preventing the washed-out effect common with walls. For fixed installations and long-term use, a dedicated screen offers superior durability, easier maintenance, and consistent performance over many years, proving to be a worthwhile investment.
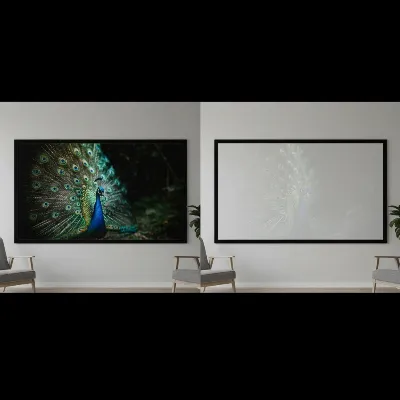 A split image comparing a clear, vibrant projection on a dedicated screen next to a slightly less defined projection on a white wall in the same room.
Conclusion
Using a white wall as a projector screen is undeniably a convenient and cost-effective option, offering impressive flexibility for size and placement. It can certainly provide a big-screen experience for casual viewing or temporary setups. However, it’s crucial to acknowledge the inherent trade-offs in image quality, including less vibrant colors, reduced contrast, and potential distortions from surface imperfections, especially when compared to a specialized projector screen.
To maximize your white wall projection, meticulous preparation, careful projector selection, environmental control, and the potential use of specialized projector paint are key. For those who prioritize a truly immersive, high-fidelity visual experience with accurate colors and deep contrast, particularly in rooms with ambient light, a dedicated projector screen remains the superior choice. Your decision should align with your specific viewing needs, expectations, and budget. What surface will you choose for your next cinematic adventure?
Frequently Asked Questions
Is a white wall as good as a projector screen?
While a white wall can function as a projector surface, it generally doesn’t offer the same image quality as a dedicated screen. Screens are designed with specific materials and coatings to optimize light reflection, color accuracy, contrast, and sharpness, which standard walls cannot replicate.
What color paint is best for a projector wall?
For a plain wall, a smooth, matte white paint is typically recommended for the brightest image. However, specialized projector paints are available in white for high resolution and brighter images, or light gray for enhanced contrast and deeper black levels, especially in rooms with some ambient light.
How smooth does a wall need to be for projection?
The smoother the wall, the better the image quality. Any bumps, textures, or imperfections on the wall surface can scatter light, causing distortions, blurring, and a loss of sharpness in the projected image. Ideally, the surface should be perfectly flat and uniform.
Can projector light damage a wall?
Projector light itself will not damage a wall. However, regularly projecting onto a wall, especially one with a matte finish, can highlight dust, dirt, or fingerprints that accumulate over time. Fading or discoloration of the paint is unlikely from the light, but physical contact or improper cleaning can cause wear.
What is “gain” in projector screens and why does it matter for walls?
Screen “gain” refers to the reflective properties of a projection surface, indicating how much light it reflects back to the viewer. A gain of 1.0 is considered neutral, reflecting light evenly. While walls have varying, typically lower, non-uniform gain, dedicated screens feature controlled gain to optimize brightness, contrast, and viewing angles, which is why they often produce a superior image.
Enhance Your White Wall Projection
Follow these steps to significantly improve your viewing experience when using a white wall as a projector screen.
Ensure your wall is perfectly smooth and flat by sanding imperfections, filling cracks, and applying a skim coat if necessary. Regularly clean the projection area with a soft, lint-free cloth to remove dust and dirt, avoiding harsh chemicals.
Select a projector with high lumen output, ideally at least 3000+ lumens, to counteract the wall's less efficient light reflection. Projectors with higher resolution (HD or 4K) will also display clearer details on an optimized surface.
Control ambient light by using blackout curtains and turning off all internal room lights, especially near the projection area. The darker the room, the more vibrant and contrasted your image will appear.
Position your projector on a stable surface directly opposite the center of your desired projection area. Adjust the throw distance to fill the space and use physical alignment before resorting to keystone correction to maintain image quality.
For a significant upgrade, apply specialized projector screen paint formulated with microscopic reflective particles. Choose white paint (gain 1.0-1.2) for bright, accurate colors or gray paint for enhanced contrast in rooms with ambient light, always opting for a matte finish.
Get our weekly buyer guide
Practical specs, not advice. Unsubscribe anytime.
I’ve been using a white wall for my kids’ video games and cartoons, and it works great for that! The simplicity of not having to set up a screen every time is a lifesaver. I agree that the contrast isn’t amazing, but for cartoons, it’s perfectly acceptable. It’s definitely a good option for casual use where perfect image quality isn’t the top priority.
This was super helpful! I was on the fence about getting a screen, but after reading about the trade-offs, I decided to go with a white wall for now. I made sure to control the environmental light in my basement, and with my high-lumen projector, the picture is surprisingly good for watching sports. It’s a fantastic temporary solution that didn’t break the bank.
I’ve been using a white wall as my projector screen for outdoor movie nights, and it’s been pretty good! The ease of setup is definitely a huge plus, especially when we’re just trying to get something going quickly. I did notice that the colors aren’t as vibrant as I’d hoped, even with my 3500-lumen projector. It’s fine for casual viewing, but I can see why a dedicated screen would be better for a true home theater experience.
I tried projecting onto my living room wall after reading about the cost-effectiveness. While it saved me money, the surface imperfections on my wall were more noticeable than I anticipated, causing some slight distortions. I spent a lot of time trying to prep the wall, but it still wasn’t perfect. I think for a really crisp image, I’d need to invest in that specialized projector paint mentioned, or just get a proper screen.