Building a budget-friendly DIY projector screen frame is an affordable and rewarding project, typically costing under $100 for materials like wood or PVC pipes and blackout cloth. This approach allows for complete customization to fit specific space and viewing needs, providing a sturdy, professional-looking screen for home theater or outdoor use. The most cost-effective materials include 1×3 or 1×4 pine boards for wooden frames, PVC pipes for portable setups, and blackout cloth for the screen surface.
Choosing Your Projector Screen Frame Materials
The foundation of any great DIY projector screen is a well-built frame. When aiming for a budget-friendly solution, you have several excellent material choices, each offering a unique balance of cost, durability, and ease of construction.
Wooden Frames
Wooden frames are a classic choice for fixed projector screens, providing a professional and robust structure. They are excellent for a dedicated home theater setup where portability isn’t a primary concern. For shop curated projector screens on this site.
- Advantages: Wood offers superior rigidity, ensuring a perfectly flat screen surface for optimal image quality. It’s also easy to work with standard woodworking tools, and materials are widely available at hardware stores. A wooden frame can be finished to match your room’s decor, giving it a polished look.
- Disadvantages: Wooden frames are generally heavier and less portable than their pipe counterparts, making them better suited for permanent installations.
- Cost-Effectiveness: Using common lumber like 1×3 or 1×4 pine boards, or even repurposing scrap wood, can keep costs remarkably low. MDF (medium-density fiberboard) is another inexpensive option that offers a smooth finish.
PVC Pipe Frames
For those prioritizing portability and extreme affordability, PVC (polyvinyl chloride) pipe frames are an outstanding option. They’re perfect for outdoor movie nights or temporary setups.
- Advantages: PVC pipes are incredibly lightweight, easy to cut with simple tools, and connect with readily available fittings. This makes them highly portable and quick to assemble and disassemble. The material itself is very cheap, making it a favorite for budget-conscious DIYers.
- Disadvantages: While sturdy enough for most applications, large PVC frames might exhibit some flexibility compared to wood or metal, which could slightly affect screen flatness.
- Cost-Effectiveness: PVC pipes and connectors are among the cheapest materials you can buy at any hardware store, often allowing you to build a substantial frame for under $35.
EMT Conduit Frames
Electrical Metallic Tubing (EMT) conduit offers a step up in durability and strength from PVC while remaining budget-friendly, particularly for larger or outdoor screens.
- Advantages: Galvanized steel EMT conduit provides excellent strength and resistance to corrosion, making it a durable choice for both indoor and outdoor use. When combined with specialized connectors (like Maker Pipe clamps), it can be assembled and disassembled for portability.
- Disadvantages: Cutting EMT conduit requires a specific handheld tubing cutter, and specialized connectors can add slightly more to the overall cost than basic PVC fittings.
- Cost-Effectiveness: EMT conduit strikes a good balance between strength and affordability, often chosen for its long-lasting nature and ability to withstand outdoor elements.
Selecting Your DIY Projector Screen Material
Once you have a frame in mind, the next crucial component is the screen material itself. The goal is a smooth, light-colored surface that effectively reflects the projector’s image without distortion.
Blackout Cloth: The Budget Champion
|
Our Picks for the Best Projector Screen in 2026
As an Amazon Associate I earn from qualifying purchases.
|
||
| Num | Product | Action |
|---|---|---|
| 1 | Pyle 50 Inch Portable Projector Screen with Tripod Stand – Lightweight, Durable, Easy Pull Setup Mobile Projection Screen with 4:3 Aspect Ratio, White Matte Fabric for Indoor/Outdoor Use |

|
| 2 | TOWOND Projector Screen with Stand, 100 inch Outdoor Projector Screen Portable Indoor Projection Screen 16:9 4K Rear Front Movie Screen with Carry Bag for Home Backyard Theater 100 inch |
|
| 3 | TOWOND Projector Screen and Stand, 150 inch Indoor Outdoor Projection Screen, Portable 16:9 4K HD Rear Front Movie Screen with Carry Bag Wrinkle-Free Design for Home Theater Backyard Cinema |
|
| 4 | Projector Screen,HUANYINGBJB 4K 16:9 HD Rear Front Projector Screen Foldable Projection Screen Double-Sided Portable Outdoor Indoor Projector Screens for Movie Home Theater (120) |
|
| 5 | AAJK Projector Screen 150 inch, Washable Projector Screen 16:9 Foldable Anti-Crease Portable Projector Movies Screen for Home Theater Outdoor Indoor Support Double Sided Projection |
|
| 6 | Taotique Projector Screen 72 inch, Movie Projector Screen 16:9 HD Foldable and Portable Anti-Crease Indoor Outdoor Projection Double Sided Video Projector Screen for Home, Party, Office, Classroom |
|
| 7 | 120inch Outdoor Projector Screen with Stand: 16:9 4K HD Portable Projector Screen Outdoor Indoor - Front/Rear Movie Screen with Carry Bag, Sandbag - Projection Screen for Backyard, Camping, Theater |
|
| 8 | 120 inch Projector Screen 2025 Upgraded- Black Backing, Straight Edges, Foldable, Washable and Wrinkle-Free - for Indoor Home Theater and Outdoor Cinema -White 16:9 by IOLIEO |
|
| 9 | TOWOND Outdoor Projector Screen with stand, 120 inch Portable Movie Screen - 16:9 4K HD Foldable Anti-Crease Projection Screen with Carry Bag for Movie Nights, Camping and Parties Support Double Sided |
|
| 10 | Outdoor Projector Screen with Stand - 120 Inch Portable Projector Screen Indoor and Outdoor Projector Screens 16:9 4K HD Wrinkle Free Lightweight Movie Screen with Carry Bag,Enioy Movie Nights |
|
When it comes to cost-effective screen materials that deliver impressive results, blackout cloth is an undeniable winner.
- Why it’s cheap and effective: Available at most fabric stores, blackout cloth typically features a white or light-grey front with a dark (usually black) backing. This construction is key: the white surface reflects light efficiently, while the black backing prevents light from passing through, significantly improving contrast and preventing “hot spots” or washout from light sources behind the screen. It’s affordable, widely available, and can be easily cut and stretched.
- Tips: Look for a wrinkle-free or easily ironed variety. A matte finish is generally preferred to avoid glare.
Other Budget-Friendly Options
While blackout cloth is often the best balance, other materials can also serve as effective, low-cost projector screens:
- White Bed Sheet: The classic, simplest, and cheapest option. Best for casual outdoor movie nights. The main challenge is keeping it perfectly taut and wrinkle-free. A high-thread-count sheet can offer better image quality, and placing a dark backing behind it can help.
- White Tarp: More durable and weather-resistant than a bedsheet, making it suitable for outdoor use. However, tarps often have a coarser texture and can be prone to wrinkles, which might affect image smoothness.
- Specialized Projection Paint on a Wall: For a truly integrated and permanent solution, painting a smooth, dedicated wall with specialized projector screen paint can be highly effective. This eliminates the need for a physical frame and offers a seamless appearance. It requires careful wall prep and masking for clean lines.
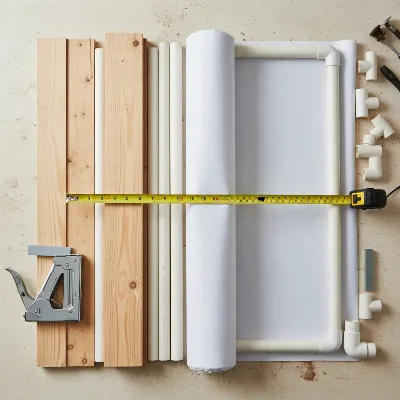 Various affordable materials for DIY projector screens, including wooden boards, PVC pipes, and a roll of white blackout cloth.
Building Your Fixed Wooden Projector Screen Frame
A fixed wooden frame provides a permanent, professional-grade viewing surface perfect for a dedicated home theater.
Tools and Materials You’ll Need
- Frame Materials:
- 1×3 or 1×4 lumber (e.g., pine, poplar, or MDF) – quantity depends on your desired screen size.
- L-brackets or corner braces.
- Wood screws (appropriate length for your lumber).
- Wood glue.
- Screen Material:
- White/white blackout cloth (ensure it’s larger than your frame dimensions).
- Finishing & Mounting:
- Flat black spray paint or black felt tape (for the border).
- Fine-grit sandpaper.
- Picture frame hangers or suitable wall mounting hardware.
- Tools:
- Measuring tape and pencil.
- Miter saw (or a hand saw with a miter box for precise angle cuts).
- Drill and screwdriver bits.
- Staple gun and 1/4-inch or 3/8-inch staples.
- Level.
Step-by-Step Construction Guide
-
Measure and Cut Your Wood:
- First, decide on your screen’s desired viewable dimensions (e.g., 100 inches diagonal in a 16:9 aspect ratio). Use an online calculator to find the exact width and height.
- Add 2-4 inches to both the width and height for your frame’s outer dimensions. This accounts for the thickness of the frame and allows fabric to wrap around.
- Cut your lumber pieces to these lengths, ensuring 45-degree mitered cuts on each end where they will join. This creates clean, professional-looking corners. For larger screens, you might consider adding internal vertical beams for extra support and rigidity, preventing any potential sag.
- Pro Tip: Cut slowly and carefully to ensure precise angles; even small inaccuracies can lead to a crooked frame.
-
Assemble the Frame:
- Lay your cut wood pieces on a flat, clean surface to form a rectangle.
- Apply wood glue to the mitered ends.
- Join the corners, securing them with L-brackets or corner braces and screws.
- Use a level to ensure the frame is perfectly square before the glue dries.
- Gently sand any sharp edges or splinters to prevent potential tearing of the screen fabric later.
-
Prepare the Screen Material:
- Unroll your blackout cloth and lay it flat on a large, clean surface, face down.
- Place your assembled wooden frame on top of the fabric, ensuring the cloth extends beyond all edges of the frame by at least 2-3 inches. This extra material is crucial for stretching.
- Trim the blackout cloth if necessary, leaving a consistent overhang.
-
Attach the Screen to the Frame:
- This step is critical for a smooth, wrinkle-free viewing surface. Start by stapling the center of one long side of the fabric to the back of the wooden frame.
- Move to the opposite long side, pull the fabric taut, and staple its center.
- Continue working from the centers towards the corners on both long sides, pulling the fabric evenly and firmly before each staple. The goal is to eliminate all wrinkles and slack.
- Repeat this process for the top and bottom short sides, again starting from the center and working outwards.
- When you reach the corners, fold the excess fabric neatly like wrapping a present and staple securely. We recommend starting from the center of one long side and maintaining an even tension as you fix a small section. Then fix the opposite side, giving enough tension to pull the fabric taut but not too much that it’s tearing at your staples, then gradually work towards the corners maintaining an even tension as you go.
-
Add a Black Border (Optional but Recommended):
- A black border around your screen significantly enhances the perceived contrast of your projected image, making it appear brighter and more defined.
- You can achieve this by carefully taping off a 2-3 inch border on the front of the screen and painting it with flat black spray paint, or by applying black felt tape around the edges. Black felt tape is often preferred for its ease of application and deep light-absorbing properties.
-
Mounting Your Fixed Screen:
- Install appropriate wall-mounting hardware on the back of your frame. Picture frame hangers or Z-bar hangers are simple and effective options.
- Locate wall studs for secure mounting, especially for larger, heavier screens.
- Use a level to ensure your screen is perfectly straight when hung.
Constructing a Portable PVC Pipe Projector Screen Frame
For flexibility and outdoor fun, a PVC pipe frame is hard to beat for its ease of construction and portability.
Tools and Materials You’ll Need
- Frame Materials:
- 3/4-inch PVC pipes (various lengths, quantity determined by screen size).
- PVC connectors: 90-degree elbows (for corners), Tee connectors (for center supports or bases), 3-way corners (for a cleaner corner look).
- PVC cement.
- Screen Material:
- White tarp, durable white blackout cloth, or pearlized spandex.
- Grommets and a grommet tool (if your fabric doesn’t have them).
- Attaching Screen:
- Ball bungees or zip ties.
- Stability (for outdoor use):
- Sandbags or ground anchors.
- Tools:
- Measuring tape and marker.
- PVC pipe cutter or a hand saw.
Step-by-Step Construction Guide
-
Plan Dimensions and Cut PVC Pipes:
- Determine the desired size of your projector screen. For outdoor setups, consider a slightly larger frame than the viewable area to allow for tensioning the screen.
- Measure and mark your PVC pipes for the top, bottom, and side pieces of your frame. Cut them to length using a PVC pipe cutter or hand saw. For example, for a 100-inch diagonal screen, you’ll need specific lengths for the width and height, plus additional pieces for connectors and potential support legs.
-
Assemble the Frame with Connectors:
- Lay out your cut PVC pieces on a flat surface.
- Apply PVC cement to the ends of the pipes and the inside of the connectors, then quickly join them. Rotate the pipe a quarter turn when inserting into the fitting to ensure even cement distribution and a secure bond.
- Start by assembling the main rectangle using 90-degree elbows for the four corners.
- If building a freestanding frame, add “T” connectors or 3-way corner connectors at the bottom corners to attach vertical support legs and horizontal feet for stability.
- Allow the PVC cement to cure fully according to the manufacturer’s instructions, typically 30 minutes to a few hours.
-
Attach the Screen Material:
- Lay your screen material flat on a clean surface. If it doesn’t have grommets, install them evenly spaced along all four edges of the fabric (e.g., every 6-12 inches).
- Place the assembled PVC frame on top of the fabric.
- Begin attaching the screen to the frame using ball bungees or zip ties. Start with the four corners, gently pulling the fabric taut.
- Then, work your way around the frame, attaching bungee cords or zip ties through the grommets and around the PVC pipe. Continue stretching the fabric evenly to remove all wrinkles and create a smooth, flat projection surface.
-
Ensure Stability (Especially for Outdoor Use):
- If your PVC frame is freestanding, especially for outdoor use, it acts like a sail in the wind.
- Use sandbags weighted down at the base of the support legs or ground anchors to secure the frame firmly. This prevents it from tipping over or shifting during use.
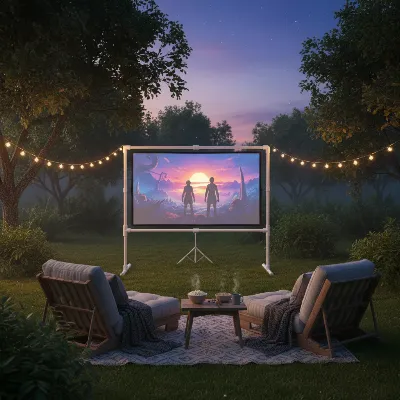 A portable DIY projector screen frame made from PVC pipes with a white fabric screen, set up outdoors in a backyard at dusk.
Essential Considerations for Your DIY Projector Screen
To get the best performance from your homemade screen, keep these key factors in mind:
- Dimensions and Aspect Ratio: Choose a screen size appropriate for your viewing distance and room size. Critically, match your screen’s aspect ratio (e.g., 16:9 for most movies and modern content, or 4:3 for older media) to your projector’s native aspect ratio. This prevents wasted projection area or distorted images.
- The Wrinkle-Free Imperative: A perfectly smooth surface is paramount. Even minor wrinkles can distort the projected image. Whether using staples, bungees, or cement, stretch your chosen screen material as tautly and evenly as possible across the frame.
- Managing Ambient Light: Blackout cloth is excellent for light control, but for rooms with significant ambient light, no budget DIY screen will perform like a specialized Ambient Light Rejecting (ALR) screen. Minimize ambient light in your viewing area where possible by dimming lights or drawing curtains.
- Fixed vs. Portable: Decide if your screen will be a permanent fixture (favoring wood) or if you need the flexibility to move and store it (making PVC or EMT conduit ideal). This choice will heavily influence your material selection and construction method.
Conclusion
Building your own projector screen frame is an incredibly satisfying and cost-effective way to enhance your home entertainment. Whether you opt for the robust, professional finish of a wooden frame or the portable, budget-friendly convenience of PVC pipes, the ability to customize your screen to your exact specifications is a significant advantage over off-the-shelf options. By carefully selecting your materials and following these straightforward steps, you can create a high-quality viewing experience for movies, games, or presentations without the hefty price tag. Embrace your inner DIY enthusiast and unlock a world of big-screen possibilities.
What cinematic masterpiece will you bring to life on your new DIY projector screen first?
Frequently Asked Questions
Frequently Asked Questions
What is the cheapest material for a DIY projector screen?
The cheapest materials for a DIY projector screen typically include a smooth white bedsheet, white blackout cloth, or a white tarp. Blackout cloth is often recommended as it offers better image quality due to its opaque nature, which prevents light bleed-through and enhances contrast, all at a very low cost.
How can I make my homemade projector screen wrinkle-free?
Achieving a wrinkle-free projector screen requires stretching the material tightly and evenly across its frame. For fabric screens, begin by securing the center of each side, then gradually work towards the corners, applying consistent tension. Using plenty of fasteners like staples, bungee cords, or zip ties will help maintain tautness.
Can a regular white bed sheet be used as a projector screen?
Yes, you can use a clean, smooth white bed sheet as a projector screen, especially for temporary or outdoor setups. To get the best results, ensure it is stretched extremely taut to remove all wrinkles. Placing a dark blanket or backing behind it can also improve image contrast by preventing light from passing through.
What tools are essential for building a DIY projector screen frame?
The tools needed depend on your chosen frame material. For a wooden frame, you'll typically need a measuring tape, saw (miter saw recommended), drill, screwdriver, staple gun, wood glue, and possibly L-brackets. For a PVC frame, a measuring tape, marker, and a PVC pipe cutter (or hand saw) are usually sufficient, along with PVC cement.
How do I ensure my DIY screen frame remains stable outdoors?
For outdoor DIY projector screen frames, especially those made from lightweight materials like PVC, stability is crucial. Secure the frame's base with heavy objects like sandbags, or use ground anchors to stake it firmly into the earth. For larger screens, consider adding guy ropes and stakes to prevent tipping in windy conditions.
Build a Fixed Wooden Projector Screen Frame
Create a professional, permanent projector screen frame using wood for a dedicated home theater setup.
Determine your desired screen dimensions (e.g., 100 inches diagonal, 16:9 aspect ratio) and add 2-4 inches for the frame's outer dimensions. Cut lumber (1x3 or 1x4 pine) to these lengths, ensuring precise 45-degree mitered cuts at each end for clean corners. Consider adding internal vertical beams for larger screens to prevent sag.
Lay the cut wood pieces on a flat surface to form a rectangle. Apply wood glue to the mitered ends and join the corners, securing them with L-brackets or corner braces and screws. Use a level to ensure the frame is perfectly square before the glue dries, then gently sand any sharp edges.
Unroll blackout cloth face down on a clean surface and place the assembled frame on top, ensuring the cloth extends 2-3 inches beyond all edges. Begin stapling the center of one long side of the fabric to the back of the frame, then move to the opposite side, pulling taut. Continue working from centers to corners on all sides, maintaining even tension to eliminate wrinkles. Fold excess fabric neatly at corners and staple securely.
Enhance image contrast by adding a black border. This can be achieved by carefully taping off a 2-3 inch border on the front of the screen and painting it with flat black spray paint, or by applying black felt tape around the edges. Black felt tape is often preferred for its ease of application and deep light-absorbing properties.
Install appropriate wall-mounting hardware, such as picture frame hangers or Z-bar hangers, on the back of your frame. Locate wall studs for secure mounting, especially for larger screens. Use a level to ensure your screen is perfectly straight when hung on the wall.
Get our weekly buyer guide
Practical specs, not advice. Unsubscribe anytime.
The PVC pipe frame idea was great for my outdoor movie nights, and it’s definitely portable. My only minor complaint is that getting the blackout cloth perfectly taut was a bit trickier than I expected. It took some extra adjustments to get rid of all the wrinkles, but once it was done, the picture quality was good.
I followed the wooden frame build using 1×4 pine boards and it turned out fantastic! The instructions were super clear, and I managed to keep the cost under $100 just like it said. My home theater setup looks so much more professional now. Definitely recommend this for anyone wanting a sturdy, custom screen.
This was exactly what I needed to upgrade my viewing experience. I went with the wooden frame for a fixed setup and it feels incredibly robust. The material choices mentioned, especially the pine boards, made it easy to source everything locally and keep the budget in check. My movies look amazing on this new screen!
I was looking for a way to get a bigger screen without breaking the bank, and this DIY guide was perfect. I used the blackout cloth suggestion and it works really well for a crisp image. The customization aspect was a huge plus, letting me fit it exactly to my wall space. Very happy with the results!