A motorized projector screen that refuses to descend or gets stuck halfway is typically caused by issues with power supply, control system malfunctions, mechanical obstructions, or internal motor/limit switch failures. For example, a loose power cord, dead remote batteries, debris in the tracks, or a miscalibrated limit switch can all prevent smooth operation. Understanding these common culprits and following a systematic troubleshooting guide can help resolve most issues within 30 minutes, restoring your screen’s functionality.
This guide is designed to help you diagnose and resolve the most frequent issues, from simple power glitches to more complex mechanical problems. We’ll walk you through a series of practical checks and solutions, empowering you to get your screen operating smoothly again, ensuring your home theater, conference room, or classroom setup remains interruption-free.
Common Reasons Your Motorized Projector Screen Gets Stuck
When a motorized projector screen refuses to move, it’s often due to one of several underlying issues. Pinpointing the exact cause is the first step toward finding an effective solution. These problems typically fall into categories related to power, mechanical obstructions, control systems, or internal components like the motor and limit switches. For projector screens buying guides on this site.
Power and Electrical Issues
A lack of power is perhaps the simplest, yet most overlooked, reason a screen might be stuck. Ensure the screen is securely plugged into a functioning power outlet. A tripped circuit breaker or a faulty wall outlet could interrupt the power supply, preventing any movement. For screens with internal fuses, a blown fuse can also halt operation, requiring careful inspection and replacement. Some advanced motorized screens feature a thermal relay, which automatically shuts off the motor if it overheats. This protective measure prevents damage and usually requires a cool-down period of 20-30 minutes before the screen will respond again.
Control System Malfunctions
The remote control is often the primary interface for your motorized screen, making it a frequent point of failure. Dead or low batteries are a common issue, easily resolved by replacement. Signal interference from other electronic devices or an obstruction between the remote and the screen’s IR receiver can also prevent commands from registering. If your screen has a wired wall switch, try using that to rule out remote-specific problems. Sometimes, the remote may simply be unsynced with the screen, requiring a re-pairing procedure, which is usually detailed in your screen’s user manual.
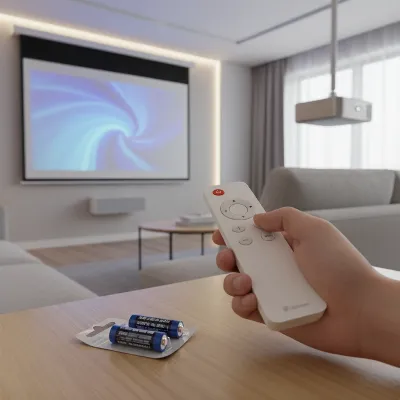 Troubleshooting a projector screen remote control with new batteries and signal check
Mechanical Obstructions
Physical impediments can be a major cause of a stuck screen. Over time, dust, debris, or even small insects can accumulate in the tracks or within the screen’s housing, blocking the smooth movement of the fabric or the weight bar. The weight bar, crucial for keeping the screen taut, can also become wedged in the casing, especially if the screen was previously forced or improperly installed. Fabric issues, such as wrinkles, edge curl, or the material rolling unevenly on the internal tube, can create resistance that the motor cannot overcome. If the screen housing or tracks are not perfectly level or plumb, it can lead to misalignment, causing the screen to bind or travel crookedly.
Motor or Limit Switch Malfunctions
|
Our Picks for the Best Projector Screen in 2026
As an Amazon Associate I earn from qualifying purchases.
|
||
| Num | Product | Action |
|---|---|---|
| 1 | Taotique Projector Screen 72 inch, Movie Projector Screen 16:9 HD Foldable and Portable Anti-Crease Indoor Outdoor Projection Double Sided Video Projector Screen for Home, Party, Office, Classroom |

|
| 2 | 120 inch Projector Screen 2025 Upgraded- Black Backing, Straight Edges, Foldable, Washable and Wrinkle-Free - for Indoor Home Theater and Outdoor Cinema -White 16:9 by IOLIEO |
|
| 3 | AAJK Projector Screen 150 inch, Washable Projector Screen 16:9 Foldable Anti-Crease Portable Projector Movies Screen for Home Theater Outdoor Indoor Support Double Sided Projection |
|
| 4 | TOWOND Projector Screen and Stand, 150 inch Indoor Outdoor Projection Screen, Portable 16:9 4K HD Rear Front Movie Screen with Carry Bag Wrinkle-Free Design for Home Theater Backyard Cinema |
|
| 5 | TOWOND Outdoor Projector Screen with stand, 120 inch Portable Movie Screen - 16:9 4K HD Foldable Anti-Crease Projection Screen with Carry Bag for Movie Nights, Camping and Parties Support Double Sided |
|
| 6 | Outdoor Projector Screen with Stand - 120 Inch Portable Projector Screen Indoor and Outdoor Projector Screens 16:9 4K HD Wrinkle Free Lightweight Movie Screen with Carry Bag,Enioy Movie Nights |
|
| 7 | 120inch Outdoor Projector Screen with Stand: 16:9 4K HD Portable Projector Screen Outdoor Indoor - Front/Rear Movie Screen with Carry Bag, Sandbag - Projection Screen for Backyard, Camping, Theater |
|
| 8 | Pyle 50 Inch Portable Projector Screen with Tripod Stand – Lightweight, Durable, Easy Pull Setup Mobile Projection Screen with 4:3 Aspect Ratio, White Matte Fabric for Indoor/Outdoor Use |
|
| 9 | TOWOND Projector Screen with Stand, 100 inch Outdoor Projector Screen Portable Indoor Projection Screen 16:9 4K Rear Front Movie Screen with Carry Bag for Home Backyard Theater 100 inch |
|
| 10 | Projector Screen,HUANYINGBJB 4K 16:9 HD Rear Front Projector Screen Foldable Projection Screen Double-Sided Portable Outdoor Indoor Projector Screens for Movie Home Theater (120) |
|
The motor is the heart of a motorized screen, and its failure can bring operation to a complete halt. You might hear grinding or clicking noises without any screen movement, indicating a motor struggling or failing. Limit switches, typically small adjustable components inside the housing, define the screen’s fully extended (down) and fully retracted (up) positions. If these switches are improperly set, damaged, or out of calibration, the screen might stop prematurely, get stuck at one end of its travel, or even attempt to over-extend or over-retract, leading to jamming.
Wear and Tear
Like any mechanical device, motorized projector screens are subject to wear and tear over time. Internal components, including the motor, gears, and wiring, can degrade with age and repeated use. Corrosion, especially in humid environments or for outdoor screens, can also impact electrical connections and moving parts, leading to intermittent or complete failure. Identifying these potential issues early can guide your troubleshooting efforts toward a quicker resolution.
Step-by-Step Troubleshooting Guide
When your motorized projector screen gets stuck, a systematic approach to troubleshooting can help you identify and resolve the problem efficiently. Always prioritize safety: if you suspect an electrical issue, or if any part of the screen appears damaged, it is best to consult a professional. Never force the screen, as this can lead to further, more extensive damage.
Initial Checks: Simple Solutions First
Begin with the easiest and most common fixes.
- Check the Power Supply:
- Verify Plug Connection: Ensure the screen’s power cord is fully inserted into a working electrical outlet. A loose plug is a surprisingly common issue.
- Test the Outlet: Plug another device into the same outlet to confirm it’s receiving power. If not, check your circuit breaker box for a tripped breaker.
- Examine Power Cable: Look for any visible damage to the power cable itself, such as cuts or crimps.
- Test the Remote Control:
- Replace Batteries: This is often the quickest fix. Even if the remote light flickers, fresh batteries can provide the necessary power for a consistent signal.
- Check IR Signal: Point your remote control at your smartphone camera and press a button. If you see a light flashing through your phone’s screen, the remote’s IR emitter is working.
- Remove Obstructions: Ensure there’s a clear line of sight between the remote and the screen’s IR receiver.
- Try Alternative Controls: If your screen has a wired wall switch, an app, or a 12V trigger, attempt to operate it using these methods. If these work, the problem likely lies with the remote itself.
- Resync Remote: Consult your screen’s manual for instructions on how to re-pair or resync your remote control, as this can sometimes be necessary if the connection is lost.
Inspecting for Mechanical Obstructions
If power and remote issues are ruled out, the problem might be mechanical.
- Visual Inspection of Tracks and Housing:
- Carefully examine the side channels or tracks of the screen for any visible debris such as dust, pet hair, or small objects. Use a soft cloth or a vacuum with a brush attachment to gently clear any obstructions.
- Look inside the housing opening (if accessible without disassembly) for anything blocking the screen’s path.
- Check the Weight Bar:
- Sometimes, the bottom weight bar can become dislodged or stuck within the screen’s casing, particularly if it’s an in-ceiling model. If you hear the motor running but the screen isn’t deploying, the weight bar might be the culprit.
- Gently try to move the weight bar by hand (if safe and accessible) to see if it’s jammed. Crucially, if the motor is still running and the screen material is unwinding inside, stop immediately to prevent fabric damage.
- Examine Fabric Condition:
- Look for any significant wrinkles, creases, or edge curling in the screen material that might be causing it to bind. While minor waves can be normal, severe imperfections can hinder movement.
- Check if the fabric is rolling unevenly onto the roller tube.
Addressing Limit Switch Issues
Limit switches control how far the screen descends and retracts. Adjusting them is often a last resort for DIY troubleshooting and comes with significant warnings.
- Understand Limit Switches: These internal switches tell the motor when to stop. Incorrect settings can cause the screen to stop too high, too low, or not at all.
- Caution: Improper adjustment can lead to irreparable damage to the screen or motor and may void your warranty. Many manufacturers recommend professional adjustment.
- General Adjustment Principle (if attempting with extreme caution and manual guidance): Limit switches usually involve small screws that, when turned, adjust the stopping points. For example, turning a “down” limit switch clockwise might decrease the screen’s deployed length, while counter-clockwise increases it. Always make very small adjustments (e.g., half-turns) and test the screen’s movement carefully. Ensure at least one full wrap of fabric remains on the roller when the screen is fully deployed to prevent damage.
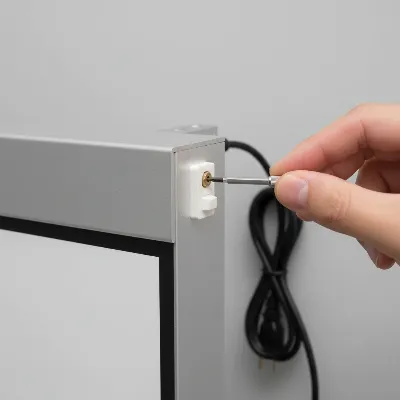 Adjusting the limit switch on a motorized projector screen with a small screwdriver
Motor and Electrical Component Checks
For issues beyond simple power and remote problems, a deeper look at the motor and other electrical components might be necessary.
- Listen to the Motor: If you hear the motor whirring or making strained noises but the screen isn’t moving, this indicates a mechanical blockage or a motor that is failing to engage the screen mechanism. Refer to the “Mechanical Obstructions” section.
- Thermal Relay Reset: If the screen stopped suddenly after extended use, allow 20-30 minutes for the motor to cool down. The thermal relay might have engaged to prevent overheating.
- Internal Fuse: Some screens have an accessible internal fuse. Consult your manual for its location and instructions on how to check or replace it. If you’re unsure, or if accessing it requires significant disassembly, it’s safer to call a professional.
Preventive Maintenance Tips
Regular maintenance can significantly extend the life of your motorized projector screen and prevent frustrating breakdowns. A little attention goes a long way in ensuring smooth operation and preserving image quality.
- Keep Tracks and Housing Clean: Periodically use a soft cloth, a microfiber duster, or a vacuum with a brush attachment to remove dust, dirt, and debris from the screen tracks and the opening of the housing. Accumulation can cause friction and jamming.
- Avoid Forcing the Screen: If the screen encounters resistance during deployment or retraction, stop immediately. Repeated attempts to force it can strain the motor, damage the fabric, or bend components. Investigate the cause of the resistance rather than pushing through it.
- Check Power Connections: Occasionally inspect the power cord and plug for secure connections and any signs of wear or damage. Ensure the outlet is functioning correctly.
- Handle with Care: When cleaning the screen surface, use only approved screen cleaners and soft microfiber cloths. Avoid harsh chemicals or abrasive materials that can damage the delicate viewing surface.
- Environmental Considerations: For screens installed in high-dust environments or outdoors, more frequent cleaning and inspection may be necessary. Protect outdoor screens from extreme weather conditions when not in use.
When to Call a Professional
While many common issues can be resolved with DIY troubleshooting, there are instances when professional intervention is not only recommended but essential. Knowing when to call an expert can prevent further damage and ensure your screen is repaired correctly and safely.
You should contact a qualified technician if:
- Persistent Issues Remain: You’ve gone through all the basic troubleshooting steps, and the screen still isn’t working or the problem recurs frequently.
- Motor Failure is Suspected: If the motor makes unusual grinding, clicking, or strained noises without the screen moving, or if there’s no sound at all despite confirmed power, the motor may need repair or replacement.
- Electrical or Wiring Concerns: Any issues beyond a simple loose plug or dead remote battery, such as faulty internal wiring, blown fuses that are difficult to access, or problems with the wall switch’s internal components, should be handled by an electrician or screen specialist.
- Internal Component Access Required: If troubleshooting requires opening the screen’s housing to access internal mechanisms like limit switches or the motor, and you’re not comfortable or equipped, a professional is the safest choice. Opening the housing can void warranties and pose safety risks due to electrical components or tensioned parts.
- Screen Damage: If the screen fabric is torn, severely wrinkled, or the roller tube is bent, these are typically repairs best left to specialists who have the tools and expertise to replace components without causing further harm.
> “While basic troubleshooting can often resolve minor hiccups, don’t hesitate to seek professional help for complex issues. It’s an investment in the longevity and optimal performance of your projector screen.” – Alex Rivera, Senior AV Technician
Conclusion
A stuck motorized projector screen can certainly be a frustrating interruption to your viewing experience or presentation. However, by systematically checking for common issues related to power, remote control functionality, mechanical obstructions, and limit switch settings, you can often diagnose and resolve the problem yourself. Always prioritize safety, avoid forcing the screen, and follow your manufacturer’s guidelines. Regular preventive maintenance will also go a long way in keeping your motorized projector screen operating smoothly for years to come. If, after your best efforts, the screen remains unresponsive or you’re dealing with complex internal issues, don’t hesitate to consult a professional. A little expert help can quickly restore your screen to perfect working order, ensuring your cinematic moments or professional presentations are never dimmed by technical glitches. What’s the most unusual reason your projector screen has ever gotten stuck?
Frequently Asked Questions
Why is my projector screen making a grinding noise but not moving?
A grinding noise without screen movement often indicates a problem with the motor or a severe mechanical obstruction. The motor might be struggling to engage the screen mechanism, or it could be failing internally. Stop operation immediately to prevent further damage and inspect for obvious blockages. If none are found, professional assessment is recommended.
How do I reset the remote control for my motorized projector screen?
The remote control reset process varies by manufacturer and model. Generally, it involves replacing batteries, ensuring a clear line of sight to the screen’s IR receiver, or performing a re-pairing sequence. This sequence might require pressing a specific combination of buttons on the remote and/or a control unit on the screen itself. Always refer to your screen’s user manual for precise instructions.
Can a power surge cause my motorized projector screen to get stuck?
Yes, a power surge can potentially damage the screen’s internal electronics, including the motor control board or the motor itself, leading to it getting stuck. Some screens have internal fuses that might blow during a surge as a protective measure. If you suspect a power surge, check for blown fuses (if accessible) and ensure all power connections are secure.
What should I do if my motorized screen stops halfway and reverses?
If your screen stops mid-travel and reverses direction, it often points to increased resistance or a miscalibrated limit switch. Check the tracks for debris, ensure the screen fabric is rolling smoothly, and verify there are no obstructions along its path. If the problem persists, the limit switches might need recalibration, which should ideally be done by a professional.
Is it safe to try and manually pull down a stuck motorized projector screen?
It is generally not safe or recommended to manually pull down a motorized projector screen that is stuck. Doing so can cause irreparable damage to the motor, the internal rolling mechanism, or the screen fabric itself, and it will likely void your warranty. If the screen is stuck, focus on troubleshooting power and control issues, and check for external obstructions before considering professional assistance.
How often should I clean my motorized projector screen?
The frequency of cleaning depends on your environment. For general use in a clean indoor space, dusting the tracks and housing every few months and gently cleaning the screen surface once or twice a year should suffice. In dusty environments or for outdoor screens, more frequent cleaning (e.g., monthly) may be necessary to prevent debris buildup.
Frequently Asked Questions
Why is my projector screen making a grinding noise but not moving?
A grinding noise without screen movement often indicates a problem with the motor or a severe mechanical obstruction. The motor might be struggling to engage the screen mechanism, or it could be failing internally. Stop operation immediately to prevent further damage and inspect for obvious blockages. If none are found, professional assessment is recommended.
How do I reset the remote control for my motorized projector screen?
The remote control reset process varies by manufacturer and model. Generally, it involves replacing batteries, ensuring a clear line of sight to the screen's IR receiver, or performing a re-pairing sequence. This sequence might require pressing a specific combination of buttons on the remote and/or a control unit on the screen itself. Always refer to your screen's user manual for precise instructions.
Can a power surge cause my motorized projector screen to get stuck?
Yes, a power surge can potentially damage the screen's internal electronics, including the motor control board or the motor itself, leading to it getting stuck. Some screens have internal fuses that might blow during a surge as a protective measure. If you suspect a power surge, check for blown fuses (if accessible) and ensure all power connections are secure.
What should I do if my motorized screen stops halfway and reverses?
If your screen stops mid-travel and reverses direction, it often points to increased resistance or a miscalibrated limit switch. Check the tracks for debris, ensure the screen fabric is rolling smoothly, and verify there are no obstructions along its path. If the problem persists, the limit switches might need recalibration, which should ideally be done by a professional.
Is it safe to try and manually pull down a stuck motorized projector screen?
It is generally not safe or recommended to manually pull down a motorized projector screen that is stuck. Doing so can cause irreparable damage to the motor, the internal rolling mechanism, or the screen fabric itself, and it will likely void your warranty. If the screen is stuck, focus on troubleshooting power and control issues, and check for external obstructions before considering professional assistance.
How often should I clean my motorized projector screen?
The frequency of cleaning depends on your environment. For general use in a clean indoor space, dusting the tracks and housing every few months and gently cleaning the screen surface once or twice a year should suffice. In dusty environments or for outdoor screens, more frequent cleaning (e.g., monthly) may be necessary to prevent debris buildup.
Fix a Stuck Motorized Projector Screen
This guide provides a systematic approach to troubleshoot and resolve common issues causing a motorized projector screen to get stuck, from power problems to mechanical obstructions.
Ensure the screen's power cord is fully inserted into a working electrical outlet. Test the outlet with another device and check your circuit breaker box for any tripped breakers. Examine the power cable for visible damage.
Replace remote batteries and check the IR signal with a smartphone camera. Remove any obstructions between the remote and the screen's receiver. Try alternative controls like a wired wall switch or app, and consult your manual to re-sync the remote if necessary.
Carefully examine the screen's side channels, tracks, and housing for debris like dust or pet hair, and gently clear any obstructions. Check if the bottom weight bar is dislodged or jammed within the casing. Look for significant wrinkles or uneven rolling of the screen fabric.
Understand that limit switches control the screen's stopping points. Improper adjustment can cause damage or void warranties. If attempting adjustment, make very small turns (e.g., half-turns) to the screws and test carefully, ensuring at least one full wrap of fabric remains on the roller when fully deployed.
Listen for grinding or strained motor noises without screen movement, indicating a mechanical blockage or failing motor. If the screen stopped after extended use, allow 20-30 minutes for the thermal relay to reset. Consult your manual for internal fuse location and replacement if accessible, or call a professional for complex electrical concerns.
Get our weekly buyer guide
Practical specs, not advice. Unsubscribe anytime.
My remote batteries were dead, and I felt pretty silly after reading that it’s a common culprit! I appreciate the reminder to check the simple things first. It’s easy to jump to conclusions about major motor failures when it’s often something much simpler. My screen is back to working perfectly now.
I had an issue with my screen getting stuck halfway, and I was hoping this would be a quick fix. While the advice on checking for mechanical obstructions was helpful, it didn’t solve my specific problem. I think my limit switch might be miscalibrated, which seems a bit more complicated to fix myself. Still, good to know what to look for.
This was a lifesaver! My screen wouldn’t descend at all, and I was worried about internal motor issues. Following the steps, I found some small debris in the tracks that was causing the jam. It took me less than 15 minutes to clear it out, and now it’s smooth as ever. Highly recommend these practical checks.
My motorized screen was totally stuck, and I was dreading calling a repairman. This guide saved me! Turns out it was just a loose power cord, which I totally overlooked. The systematic troubleshooting really helped me pinpoint the problem quickly. So glad I found these tips before spending a fortune.