A projector screen that refuses to retract quickly, or even at all, can disrupt your viewing experience or presentation. Whether it’s a home cinema setup or a professional conference room, a malfunctioning screen can be a frustrating hurdle. Understanding the underlying causes, from mechanical glitches in manual screens to electrical hiccups in motorized ones, is the first step toward a successful repair. This comprehensive guide will walk you through common issues and provide clear, actionable steps to get your projector screen rolling smoothly back into its case.
Understanding Your Projector Screen’s Retraction Mechanism
Before diving into fixes, it’s crucial to understand how your specific projector screen operates. The two primary types, manual and electric, have distinct mechanisms that can lead to retraction problems.
Manual Projector Screens
|
Our Picks for the Best Projector Screen in 2026
As an Amazon Associate I earn from qualifying purchases.
|
||
| Num | Product | Action |
|---|---|---|
| 1 | AAJK Projector Screen 150 inch, Washable Projector Screen 16:9 Foldable Anti-Crease Portable Projector Movies Screen for Home Theater Outdoor Indoor Support Double Sided Projection |

|
| 2 | Pyle 50 Inch Portable Projector Screen with Tripod Stand – Lightweight, Durable, Easy Pull Setup Mobile Projection Screen with 4:3 Aspect Ratio, White Matte Fabric for Indoor/Outdoor Use |
|
| 3 | TOWOND Projector Screen and Stand, 150 inch Indoor Outdoor Projection Screen, Portable 16:9 4K HD Rear Front Movie Screen with Carry Bag Wrinkle-Free Design for Home Theater Backyard Cinema |
|
| 4 | Outdoor Projector Screen with Stand - 120 Inch Portable Projector Screen Indoor and Outdoor Projector Screens 16:9 4K HD Wrinkle Free Lightweight Movie Screen with Carry Bag,Enioy Movie Nights |
|
| 5 | 120 inch Projector Screen 2025 Upgraded- Black Backing, Straight Edges, Foldable, Washable and Wrinkle-Free - for Indoor Home Theater and Outdoor Cinema -White 16:9 by IOLIEO |
|
| 6 | 120inch Outdoor Projector Screen with Stand: 16:9 4K HD Portable Projector Screen Outdoor Indoor - Front/Rear Movie Screen with Carry Bag, Sandbag - Projection Screen for Backyard, Camping, Theater |
|
| 7 | Projector Screen,HUANYINGBJB 4K 16:9 HD Rear Front Projector Screen Foldable Projection Screen Double-Sided Portable Outdoor Indoor Projector Screens for Movie Home Theater (120) |
|
| 8 | TOWOND Projector Screen with Stand, 100 inch Outdoor Projector Screen Portable Indoor Projection Screen 16:9 4K Rear Front Movie Screen with Carry Bag for Home Backyard Theater 100 inch |
|
| 9 | Taotique Projector Screen 72 inch, Movie Projector Screen 16:9 HD Foldable and Portable Anti-Crease Indoor Outdoor Projection Double Sided Video Projector Screen for Home, Party, Office, Classroom |
|
| 10 | TOWOND Outdoor Projector Screen with stand, 120 inch Portable Movie Screen - 16:9 4K HD Foldable Anti-Crease Projection Screen with Carry Bag for Movie Nights, Camping and Parties Support Double Sided |
|
Manual projector screens typically rely on a spring-loaded roller system. When you pull the screen down, a ratchet and pawl mechanism locks it into place at various intervals. To retract the screen, a slight downward tug disengages the lock, allowing the internal spring to coil the screen fabric back into its housing. The speed and smoothness of this retraction are entirely dependent on the spring’s tension and the free movement of the internal components.
Electric Projector Screens
Electric, or motorized, projector screens offer convenience through automation. They feature an integrated motor that rolls the screen up or down, controlled by a remote, wall switch, or even a projector trigger. These screens incorporate “limit switches” that define the screen’s fully retracted (up) and fully deployed (down) stopping points. The motor drives the roller, and the limit switches prevent over-extension or over-retraction, protecting both the screen and the motor.
Common Reasons for Slow or Failed Retraction
Various factors can contribute to a projector screen’s reluctance to retract. Identifying the specific problem is key to applying the correct solution.
For Manual Screens
Manual screens often encounter issues due to their mechanical nature. Over time, components can wear, collect dust, or lose their original settings.
- Loss of Spring Tension: This is the most frequent culprit. The internal spring mechanism might lose its elasticity or become unwound, lacking the force to pull the screen back up efficiently.
- Internal Obstructions or Debris: Dust, dirt, small insects, or even slight warping of the screen fabric can jam the internal roller mechanism, preventing smooth retraction.
- Lack of Lubrication: The moving parts within the screen’s housing, particularly around the spring and roller, require minimal friction. A lack of proper lubrication can cause sluggish movement or complete sticking.
- Worn Components: The ratchet and pawl system, or other plastic gears, can wear out over years of use, failing to engage or disengage properly.
For Electric Screens
Electric screens, while offering more convenience, introduce electrical and electronic components that can also fail.
- Power Supply Issues: A motorized screen needs consistent power. This could be due to a loose power cable, a tripped circuit breaker, a dead battery in the remote, or even a blown fuse within the unit itself.
- Remote Control or Wall Switch Malfunction: The command system might be at fault. The remote could have dead batteries, be out of sync, or the wall switch might be faulty.
- Motor Problems: The motor itself can fail due to age, electrical surges, or continuous strain. Signs might include a buzzing sound without movement, or no response at all.
- Misadjusted Limit Switches: These crucial switches dictate the screen’s stopping points. If a limit switch is set incorrectly, the screen might stop prematurely, not retract fully, or even attempt to retract too far, putting strain on the motor.
- Physical Obstructions or Foreign Objects: Just like manual screens, debris can interfere with the rolling mechanism, or the screen fabric itself might get caught or bunch up, preventing smooth operation.
Troubleshooting and Fixing Manual Projector Screens
Repairing a manual screen often involves mechanical adjustments. Always proceed with caution, especially when dealing with spring mechanisms.
Step 1: Initial Checks and Gentle Assistance
If your manual screen is stuck or slow, start with the simplest solutions. First, ensure there are no obvious obstructions along the screen’s edges or in the path of the bottom bar. Gently try to pull the screen down a couple of inches to see if it frees up. If it’s still resistant, give the screen a quick, firm yank downwards. This can sometimes dislodge the internal locking mechanism that might be stuck. Ensure you are not standing directly underneath the screen’s housing when doing this for safety.
Step 2: Re-tensioning the Spring Mechanism
A common reason for slow retraction is insufficient spring tension. This often requires accessing the screen’s internal mechanism.
- Safety First: Remove the projector screen from its mounting brackets. Lay it on a clean, flat, and stable surface. You might need assistance, as screens can be bulky.
- Accessing the Housing: Carefully open the end cap of the screen housing on the side where the spring mechanism is located. This usually involves unscrewing a few fasteners or gently prying open a plastic cover. Be extremely cautious, as the spring may still have some residual tension.
- Winding the Spring: Once you have access to the spring mechanism, you will see a flat shaft or a similar point where you can apply torque. Using a wrench or a pair of small-nose pliers (if applicable), carefully rotate the shaft clockwise. It’s generally recommended to apply about 10 to 15 full turns to increase tension. Some sources suggest winding until resistance is felt, then a few more turns. Too much tension can damage the screen, so err on the side of caution.
- Reassembling: Once re-tensioned, carefully reassemble the end cap. Test the screen’s retraction by gently pulling it down and releasing. The screen should now retract smoothly and quickly.
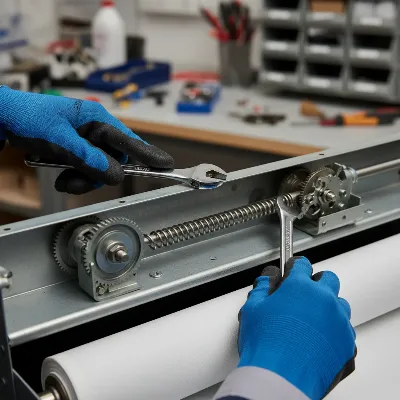 Technician adjusting the spring tension on a manual projector screen.
Step 3: Lubrication and Cleaning
Over time, friction can build up within the rolling mechanism.
- Cleaning: Use a soft, lint-free cloth to gently clean the visible parts of the roller mechanism and the edges of the screen fabric where it enters and exits the housing. Remove any accumulated dust or debris.
- Lubrication: Apply a silicone-based or dry lubricant spray sparingly to the internal moving parts of the spring mechanism and the roller ends. Avoid oil-based lubricants, as they can attract more dust and potentially damage the screen material. Spray onto a cloth first and then wipe the components, rather than spraying directly into the housing, to prevent overspray onto the screen fabric.
Troubleshooting and Fixing Electric Projector Screens
Fixing an electric screen often involves checking electrical connections and adjusting electronic settings.
Step 1: Power and Control Checks
Start by ensuring your screen is receiving power and that the control method is working correctly.
- Verify Power: First, confirm the screen is plugged into a live outlet. Check the power cable for any damage and ensure it’s securely connected. If the screen has an internal fuse, inspect it for a blow and replace if necessary.
- Test Remote/Wall Switch: If using a remote control, replace the batteries. Try syncing or reprogramming the remote according to your screen’s user manual. For a wall switch, check its connections and functionality. If the screen has a manual override button, try using that to rule out remote/switch issues.
Step 2: Clearing Obstructions
Even electric screens can get snagged.
- Inspect Thoroughly: Carefully lower the screen (if it moves at all) and visually inspect the entire length of the screen fabric and the internal housing for any foreign objects, debris, or fabric bunching that might be impeding movement. Look for dimples on the screen surface, which can indicate trapped particles within the roll.
- Gentle Removal: Carefully remove any obstructions. For dimples caused by trapped particles, gently try to remove the particle from either side of the screen if accessible. These dimples should flatten out over a few days once the obstruction is gone.
Step 3: Adjusting Limit Switches
Limit switches control the screen’s stopping points and are a frequent cause of retraction issues. Adjusting them incorrectly can cause damage, so proceed carefully.
- Identify Switches: Locate the limit switches on your screen’s motor housing (often on the left side when facing the screen). There are typically two: one for the “up” (retracted) position and one for the “down” (deployed) position. They may be color-coded (e.g., white for down, yellow for up) or simply labeled with symbols (+/-).
- Safety Precautions: Always unplug the screen from power before making adjustments. Do not adjust the switches while the screen is resting fully at its up or down limit. Instead, move the screen about one foot away from the problematic limit before adjusting.
- Adjusting for Slow Retraction (Up Limit): If your screen isn’t retracting fully into its case or stops too early, you may need to adjust the “up” limit.
- To make the screen retract further into the case (increase travel), turn the “up” limit switch counter-clockwise (towards the ‘+’ symbol if present).
- To make the screen stop sooner (decrease travel) if it’s going too far, turn the “up” limit switch clockwise (towards the ‘-‘ symbol).
- Adjusting for Over-Deployment (Down Limit): If the screen is deploying too far or struggling to begin retraction, the “down” limit might be misset.
- To reduce the screen’s deployed drop (make it stop higher), turn the “down” limit switch clockwise (towards the ‘-‘ symbol).
- To increase the screen’s deployed drop (make it go lower), turn the “down” limit switch counter-clockwise (towards the ‘+’ symbol).
- Test and Repeat: Make small adjustments (half turns of a 5/32″ hex driver at a time) and test the screen’s movement after each adjustment. Repeat until the desired stopping position is achieved. Ensure at least 1 to 1.5 wraps of fabric remain on the roller when the screen is fully deployed to prevent damage to the screen material.
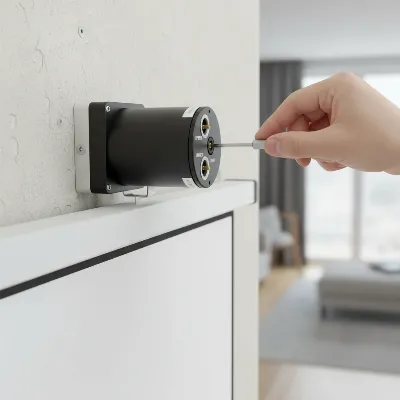 Adjusting limit switches on an electric projector screen's motor.
Step 4: Addressing Motor Issues
If the screen still won’t retract after checking power, clearing obstructions, and adjusting limit switches, the motor itself might be at fault. Signs of motor failure include no movement despite power, a humming or grinding sound without screen motion, or inconsistent operation. Motor repair is typically complex and often requires professional service or replacement of the motor. Consult your screen’s warranty before attempting any advanced motor repairs yourself.
Preventative Maintenance for Smooth Retraction
Regular maintenance can significantly extend the life of your projector screen and prevent retraction issues.
- Regular Cleaning: Dust and dirt are enemies of smooth operation. Gently wipe down the screen surface with a soft, lint-free cloth. Periodically clean the screen housing and the edges of the fabric where it interfaces with the case.
- Proper Usage: Avoid yanking manual screens excessively or forcing electric screens if they encounter resistance. Operate the screen smoothly and patiently.
- Occasional Inspection: Every few months, take a moment to inspect your screen for any signs of wear and tear, loose components, or unusual sounds during operation. Early detection of issues can prevent more significant problems down the line.
- Lubrication (Manual Screens): For manual screens, a light application of silicone-based lubricant to the spring mechanism once every year or two can help maintain smooth action.
When to Call a Professional
While many projector screen issues can be resolved with DIY troubleshooting, some problems are best left to experts.
- Electrical Issues: If you suspect a major electrical fault, wiring problem, or motor failure in an electric screen, it’s safer to contact a qualified technician. Tampering with electrical components without proper knowledge can be dangerous.
- Major Component Damage: A broken spring in a manual screen or a completely failed motor in an electric screen might require specialized tools or replacement parts that are not readily available to the average user.
- Warranty Considerations: Attempting extensive DIY repairs may void your screen’s warranty. Always check the warranty terms before undertaking significant repairs.
- Persistent Problems: If you’ve tried all the troubleshooting steps and the screen still isn’t retracting properly, a professional can offer a more in-depth diagnosis and solution.
Troubleshooting a slow-retracting projector screen involves methodical checks and, for some issues, careful mechanical or electrical adjustments. From re-tensioning a spring in a manual model to fine-tuning limit switches on an electric one, a little patience and the right steps can often restore your screen to perfect working order. Remember, safety is paramount, especially when dealing with internal mechanisms or electrical components. By understanding how your screen operates and applying these solutions, you can enjoy uninterrupted viewing for years to come.
What steps will you take first to get your projector screen retracting like new?
Frequently Asked Questions
What causes a manual projector screen to not retract?
A manual projector screen usually fails to retract due to a loss of tension in its internal spring mechanism, which is responsible for rolling the screen up. Other common causes include internal obstructions like dust or debris jamming the roller, or a lack of lubrication on moving parts, increasing friction.
Can I fix a motorized projector screen that won’t go up?
Yes, many issues with a motorized projector screen not retracting can be fixed. Start by checking the power supply, remote batteries, and control switch. Often, the problem lies with misadjusted limit switches that control the screen’s stopping points, or minor obstructions within the housing.
How often should I lubricate my projector screen’s mechanism?
For manual projector screens, it is generally recommended to lubricate the internal spring mechanism with a silicone-based or dry lubricant spray once every one to two years. Electric screens typically do not require user lubrication, as their motors are sealed units.
Is it safe to disassemble my projector screen for repair?
Disassembling a projector screen, especially manual ones with high-tension springs, carries inherent risks. Always unplug electric screens. If you are uncomfortable with mechanical work or spring tension, or if your screen is under warranty, it’s safer to consult a professional or refer to the manufacturer’s instructions.
What tools do I need to adjust projector screen limits?
To adjust the limit switches on most electric projector screens, you typically need a small hex driver, often a 5/32″ Allen wrench. These adjustments should be made slowly and carefully, usually in half-turn increments, to prevent damage to the motor or screen mechanism.